
You’ve designed something amazing in Canva—now it’s time to share it. And that’s where many people get stuck, as they search for the fastest way to do it.
Should you download and upload manually? Use Canva’s native scheduler? Or connect to a social media management tool like Gain for client approvals, auto-scheduling, and publishing?
The right method depends on a few key factors, such as whether you’re managing social media for yourself, working on a marketing team, or running an agency that needs client approvals before publishing.
In this guide, we’ll walk you through 4 different ways you can publish your Canva designs to social media, including the pros and cons of each method.
Let’s jump right in!
4 Ways You Can Publish Your Canva Designs to Social Media
Canva has become the go-to design platform for creators, marketers, and businesses alike—and one of its biggest strengths is how easily you can turn a finished design into a published piece of content.
Once your design is complete, Canva offers multiple publishing options directly within the platform. But there are also third-party tools that can help you get the job done while offering additional capabilities.
Here are the best ways to share your Canva designs on social media👇
Method 1: Download and Save Your Designs Locally
Downloading your Canva design is the most straightforward way to publish content. It gives you full control over the file format and lets you decide when and where to post. This method is commonly used when publishing manually to platforms that aren’t connected to Canva or when you want to keep a backup of your visuals. Plus, unlike the Canva Schedule tool (more on that later), simply downloading and saving your content assets locally doesn’t require a paid subscription.
How to Download Your Canva Design
- Open your design in Canva
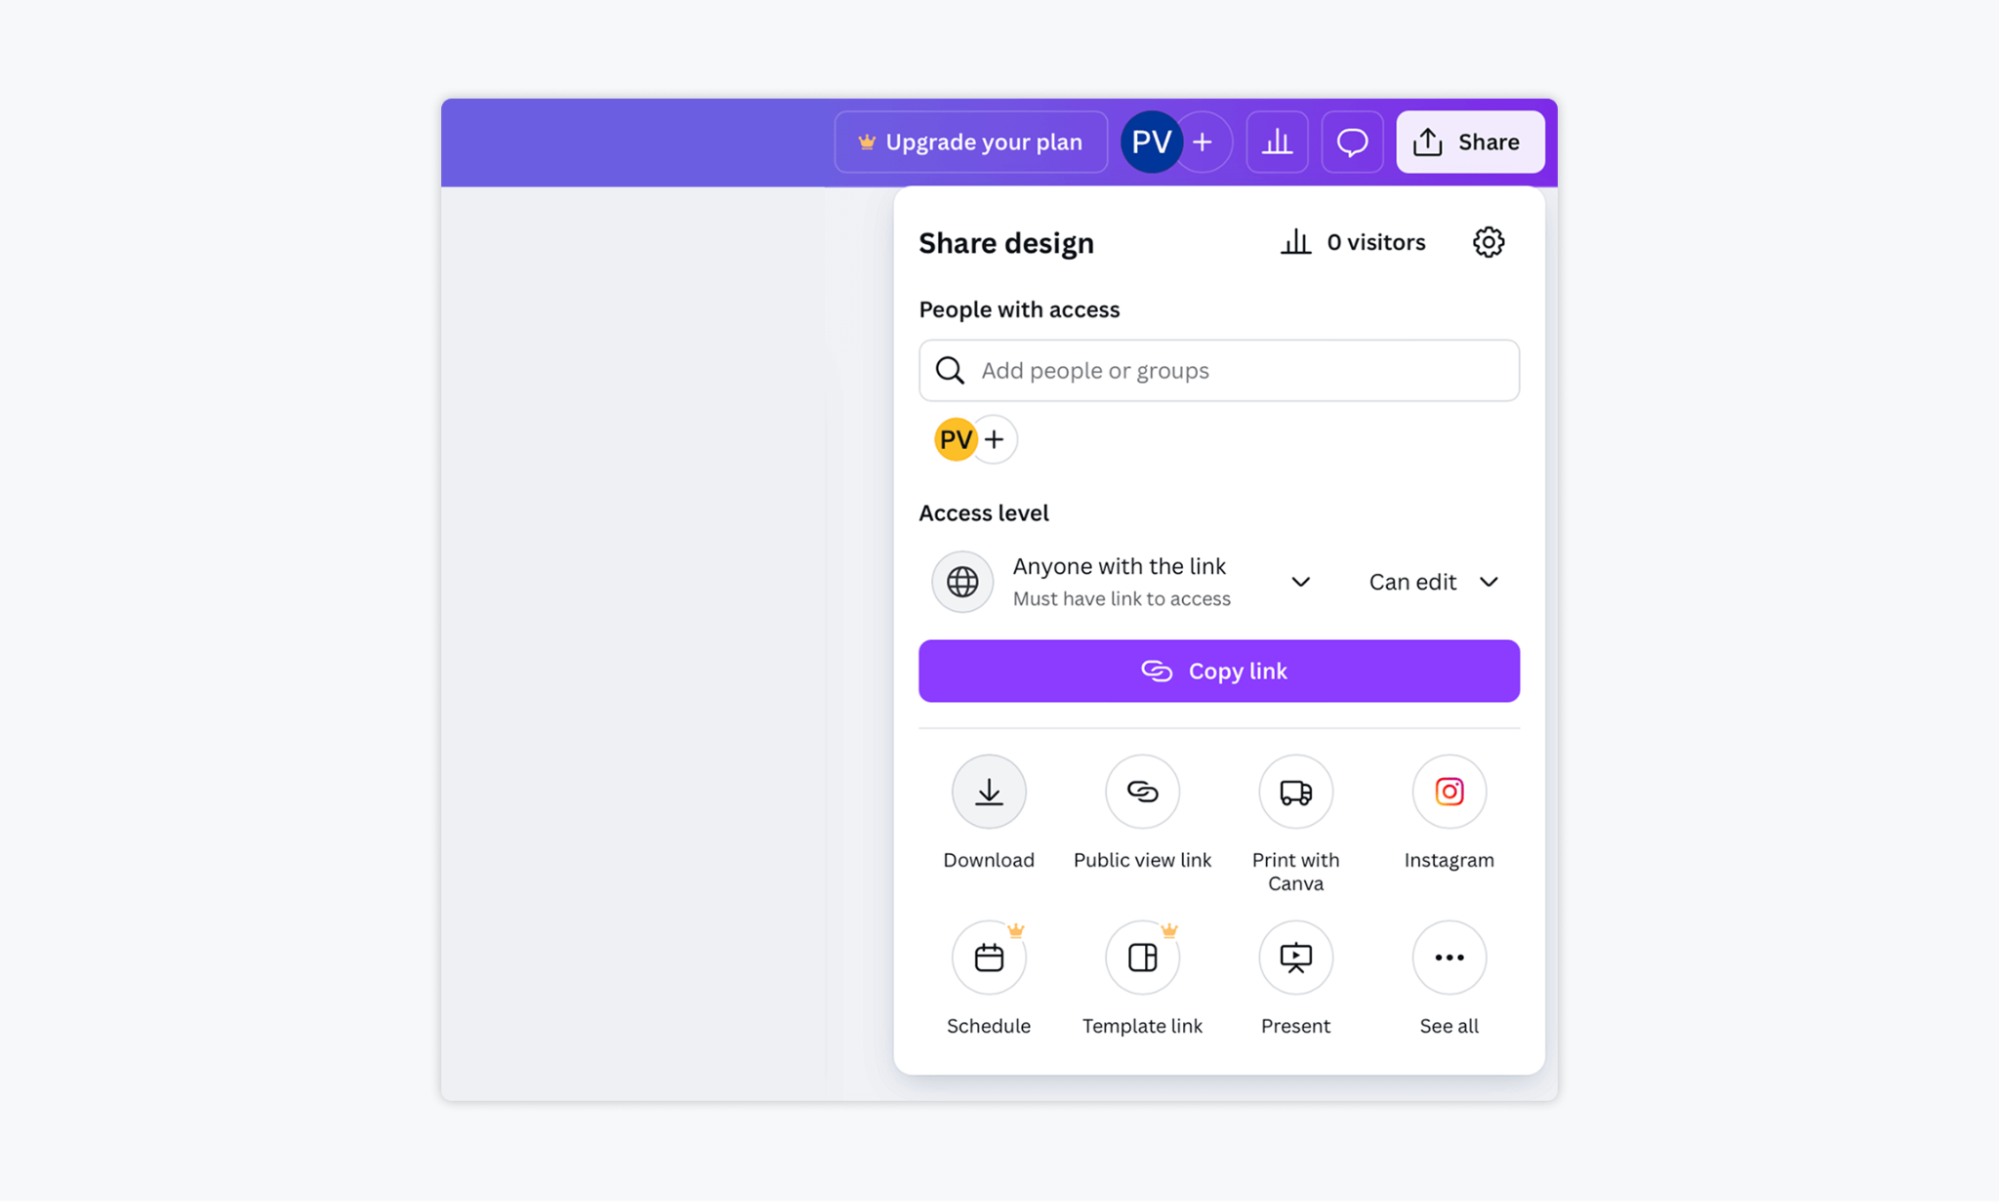
- Click the Share button in the top right corner
- Select Download from the menu
- Choose your preferred file type (PNG, JPG, PDF, etc.)
- Click Download and save the file to your device
Pros and Cons
| ✅ Pros | ❌ Cons |
| Full control over file format | No auto-posting or scheduling |
| Keeps a local backup of your content | No version control or edit tracking |
| Works with any social platform manually |
Best for: Solo creators who post sparingly and don’t want to invest in third-party tools.
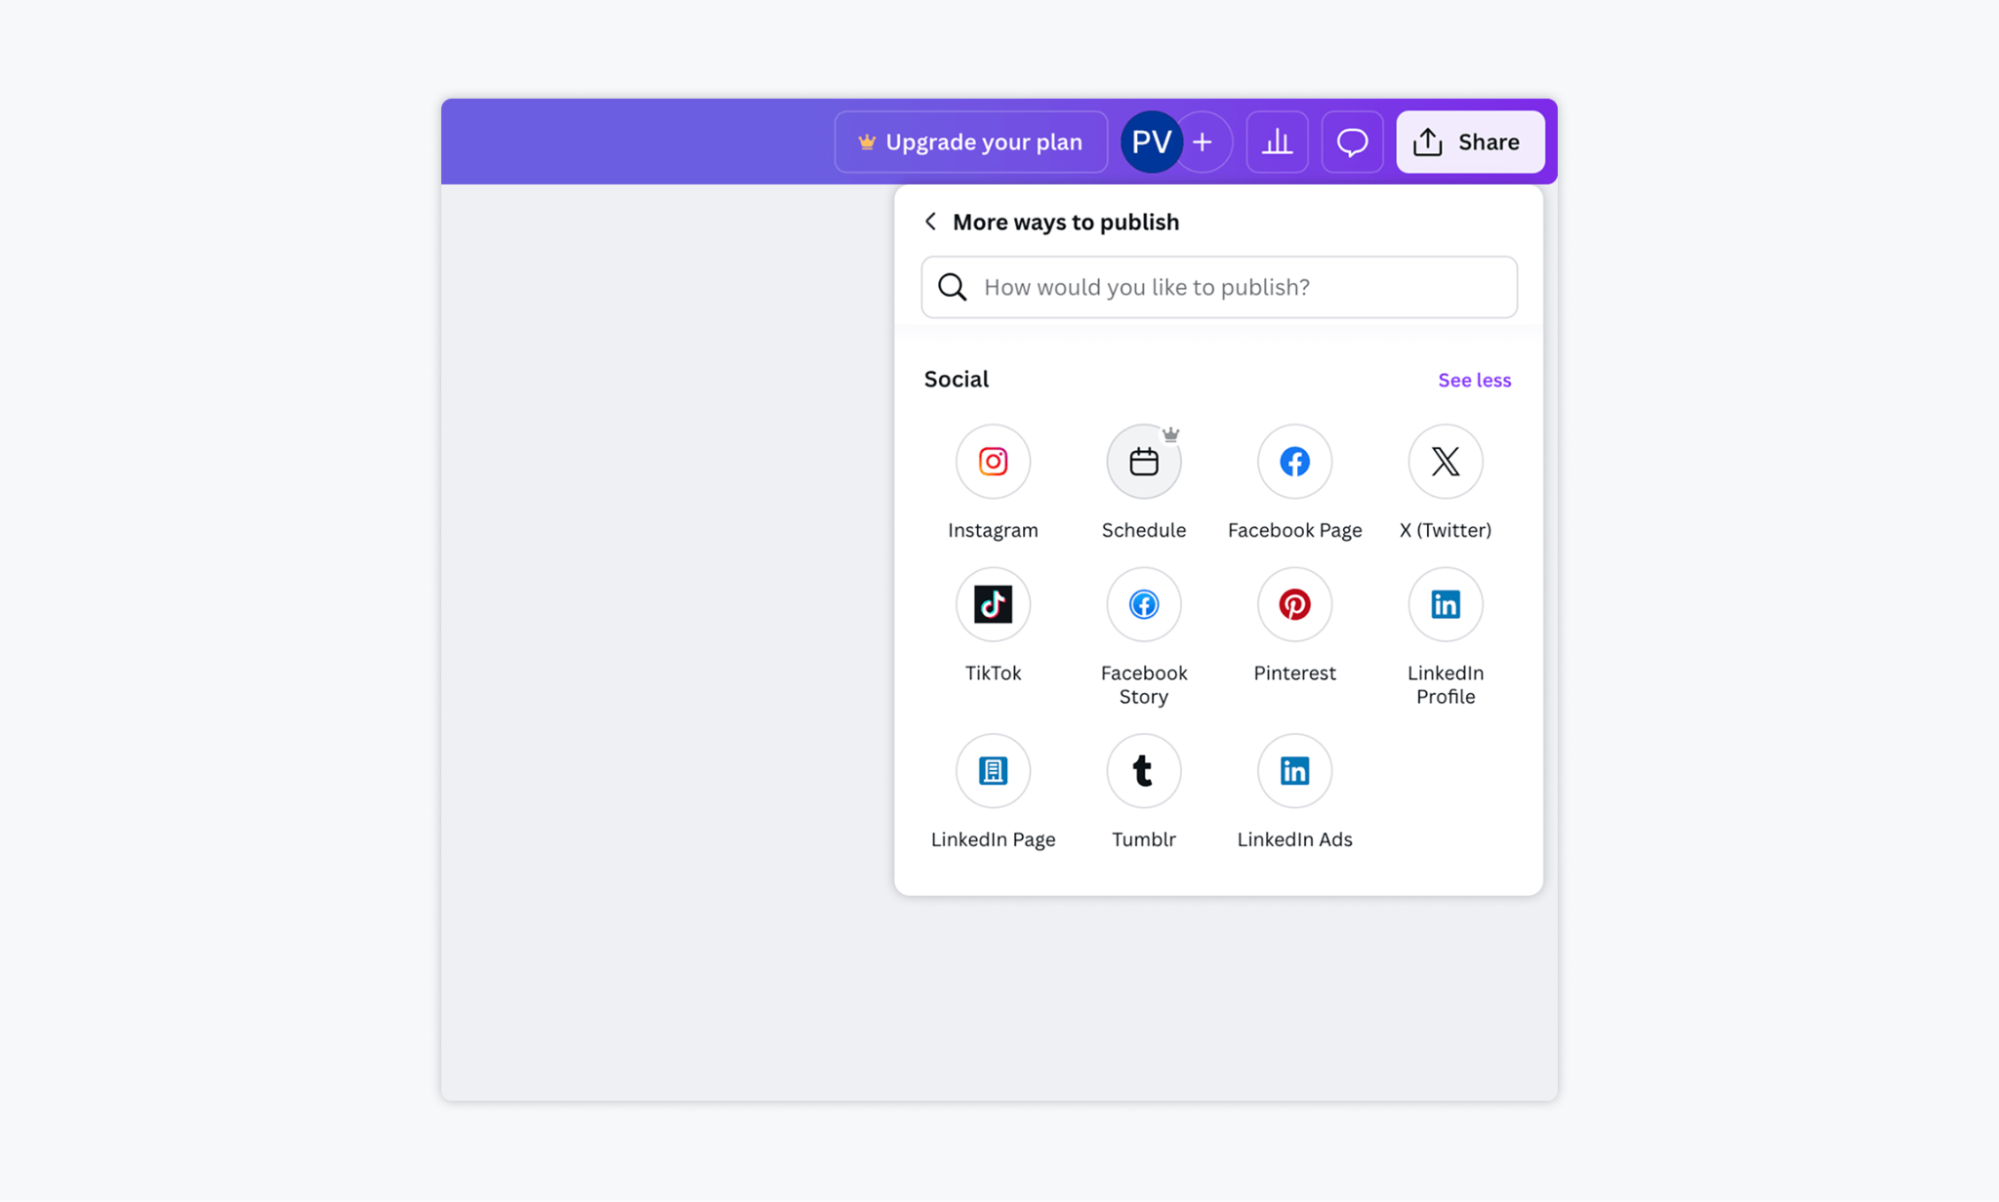
Method 2: Post Directly from Canva to Social Media
Another way to publish your designs is by sharing them directly from Canva to your connected social media accounts. Once you’ve finished editing, you can post straight to platforms like Instagram, Facebook Pages or Stories, X (Twitter), Pinterest, TikTok, LinkedIn (Profile, Page, or Ads), and Tumblr—all without downloading your content.
How to Post Directly from Canva
- Open your design in Canva
- Click the Share button in the top right corner
- Scroll to Social
- Select your connected social media account from the list
- Add your caption or description
- Click Post now to publish immediately
Pros and Cons
| ✅ Pros | ❌ Cons |
| Quick and easy publishing to multiple platforms | No way to schedule for later |
| No need to download or switch tools | No team approvals or workflow collaboration |
| Supports major platforms like Instagram, X, TikTok |
Best for: Creators or small teams who want to publish immediately to social platforms without using a specialized tool.
Method 3: Schedule Posts with Canva Pro
Next up, we have Canva Schedule, a built-in content planner available to Canva Pro users. This tool enables you to create, plan, and schedule social media posts directly within Canva—no downloads or additional apps required. You can schedule content across platforms like Facebook, Instagram, X (Twitter), and LinkedIn, choosing exactly when your post should go live.
You can also pause, reschedule, or edit posts before they publish, and track engagement through basic performance insights, such as clicks, likes, and comments.
How to Schedule a Post in Canva
- Open your design in Canva
- Click the Share button in the top right corner
- Select Schedule (available for Pro users)
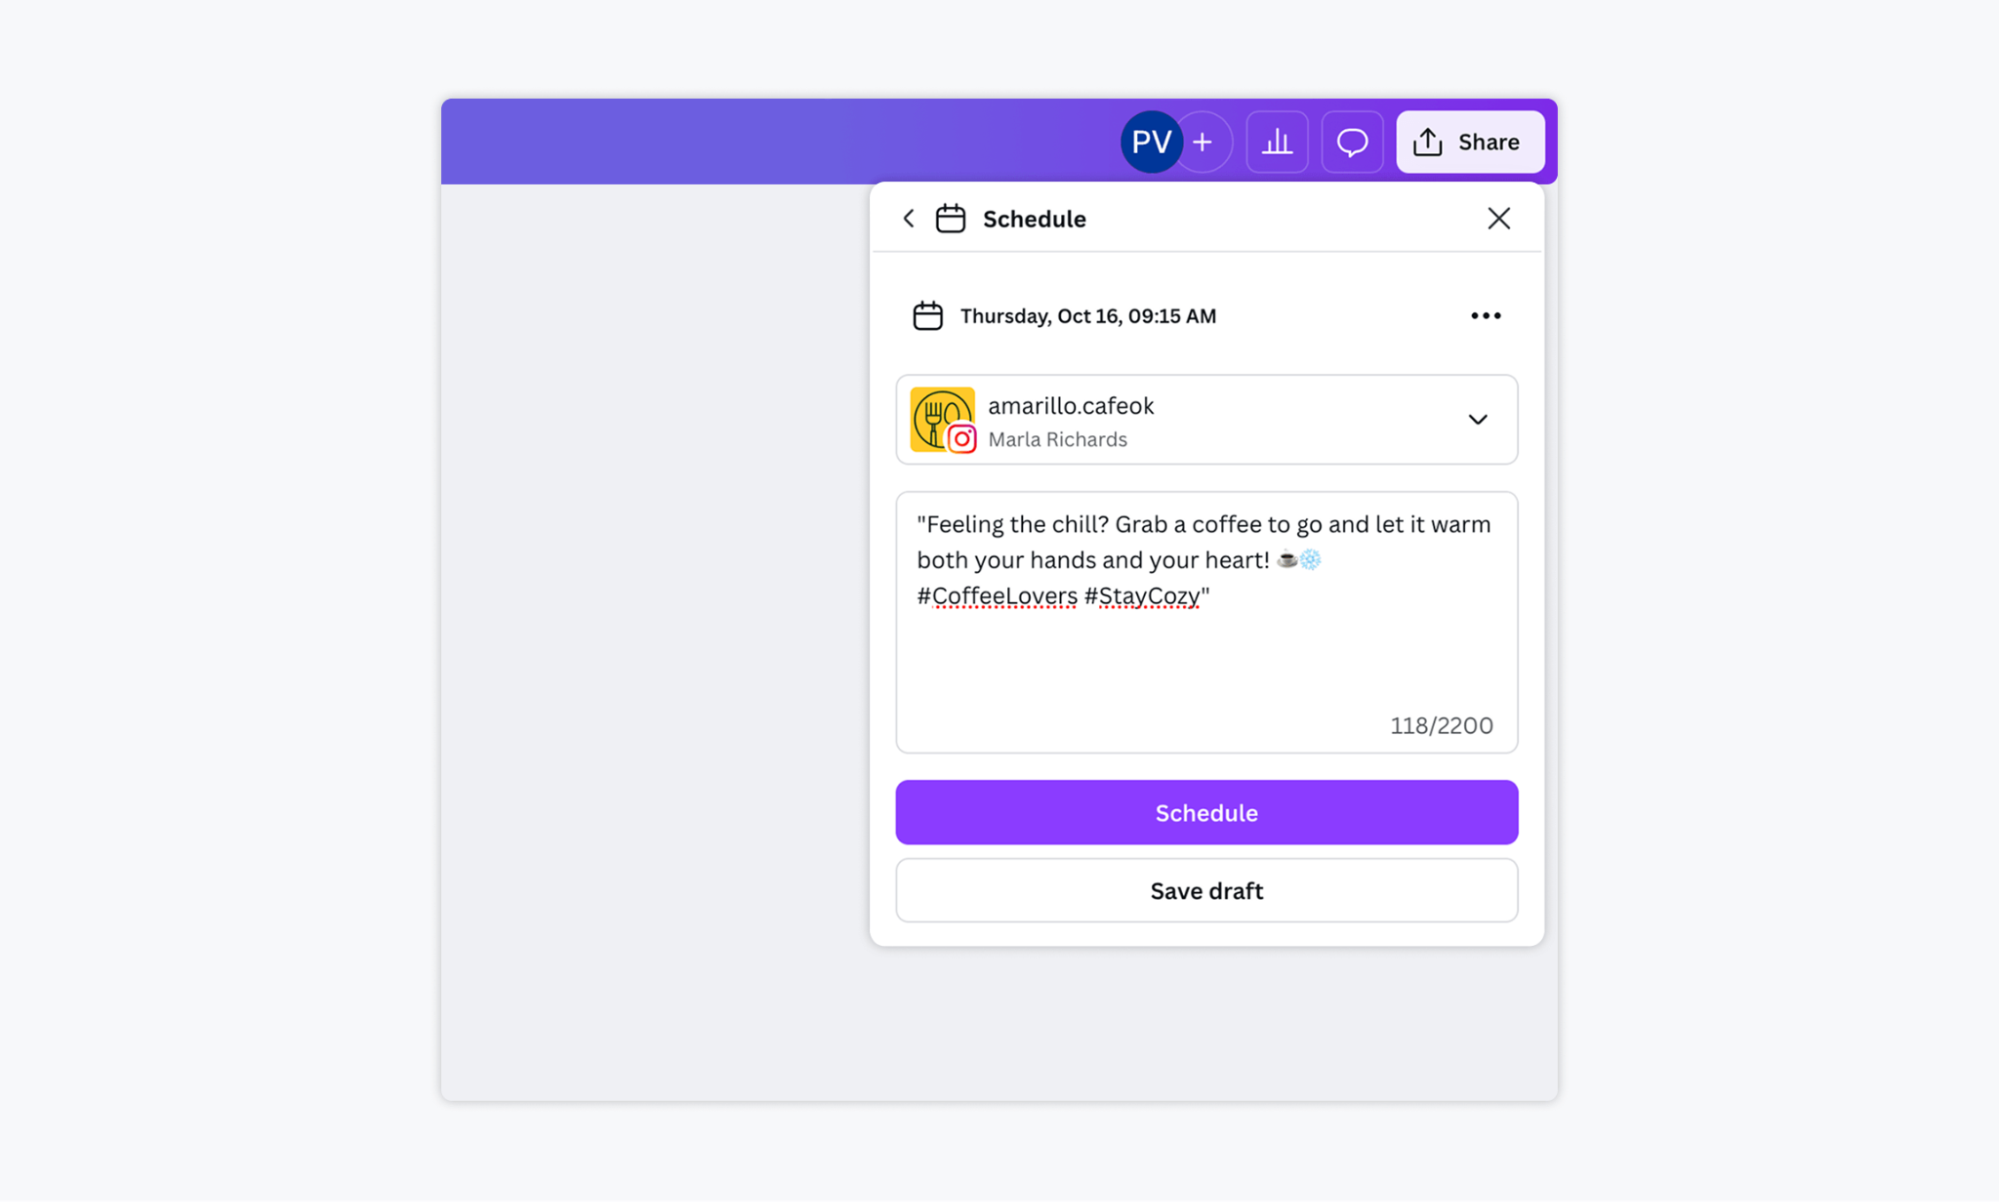
- Choose a connected social media account
- Set your preferred date and time
- Add your caption and click Schedule Post
Pros and Cons
| ✅ Pros | ❌ Cons |
| Schedule posts across multiple platforms from Canva | Only available with a Canva Pro subscription |
| No need to download or use another tool | Not ideal for multi-client or agency workflows |
Best for: Solo creators or small businesses that need built-in scheduling with simple performance tracking.
Method 4: Publish Canva Designs with Gain
If you’re a marketing agency that needs client sign-off before publishing, a better option is to use Gain. Through the Gain + Canva integration, you can send your designs directly from Canva into Gain, where they become social posts that can be routed through customizable client approval workflows.
Once approved, Gain automatically schedules and publishes your content to platforms like Instagram, Facebook, LinkedIn, X (Twitter), TikTok, and more. This all-in-one workflow makes it ideal for agencies and marketing teams managing multiple brands or clients.
How to Publish Canva Designs with Gain
- Connect Canva with Gain
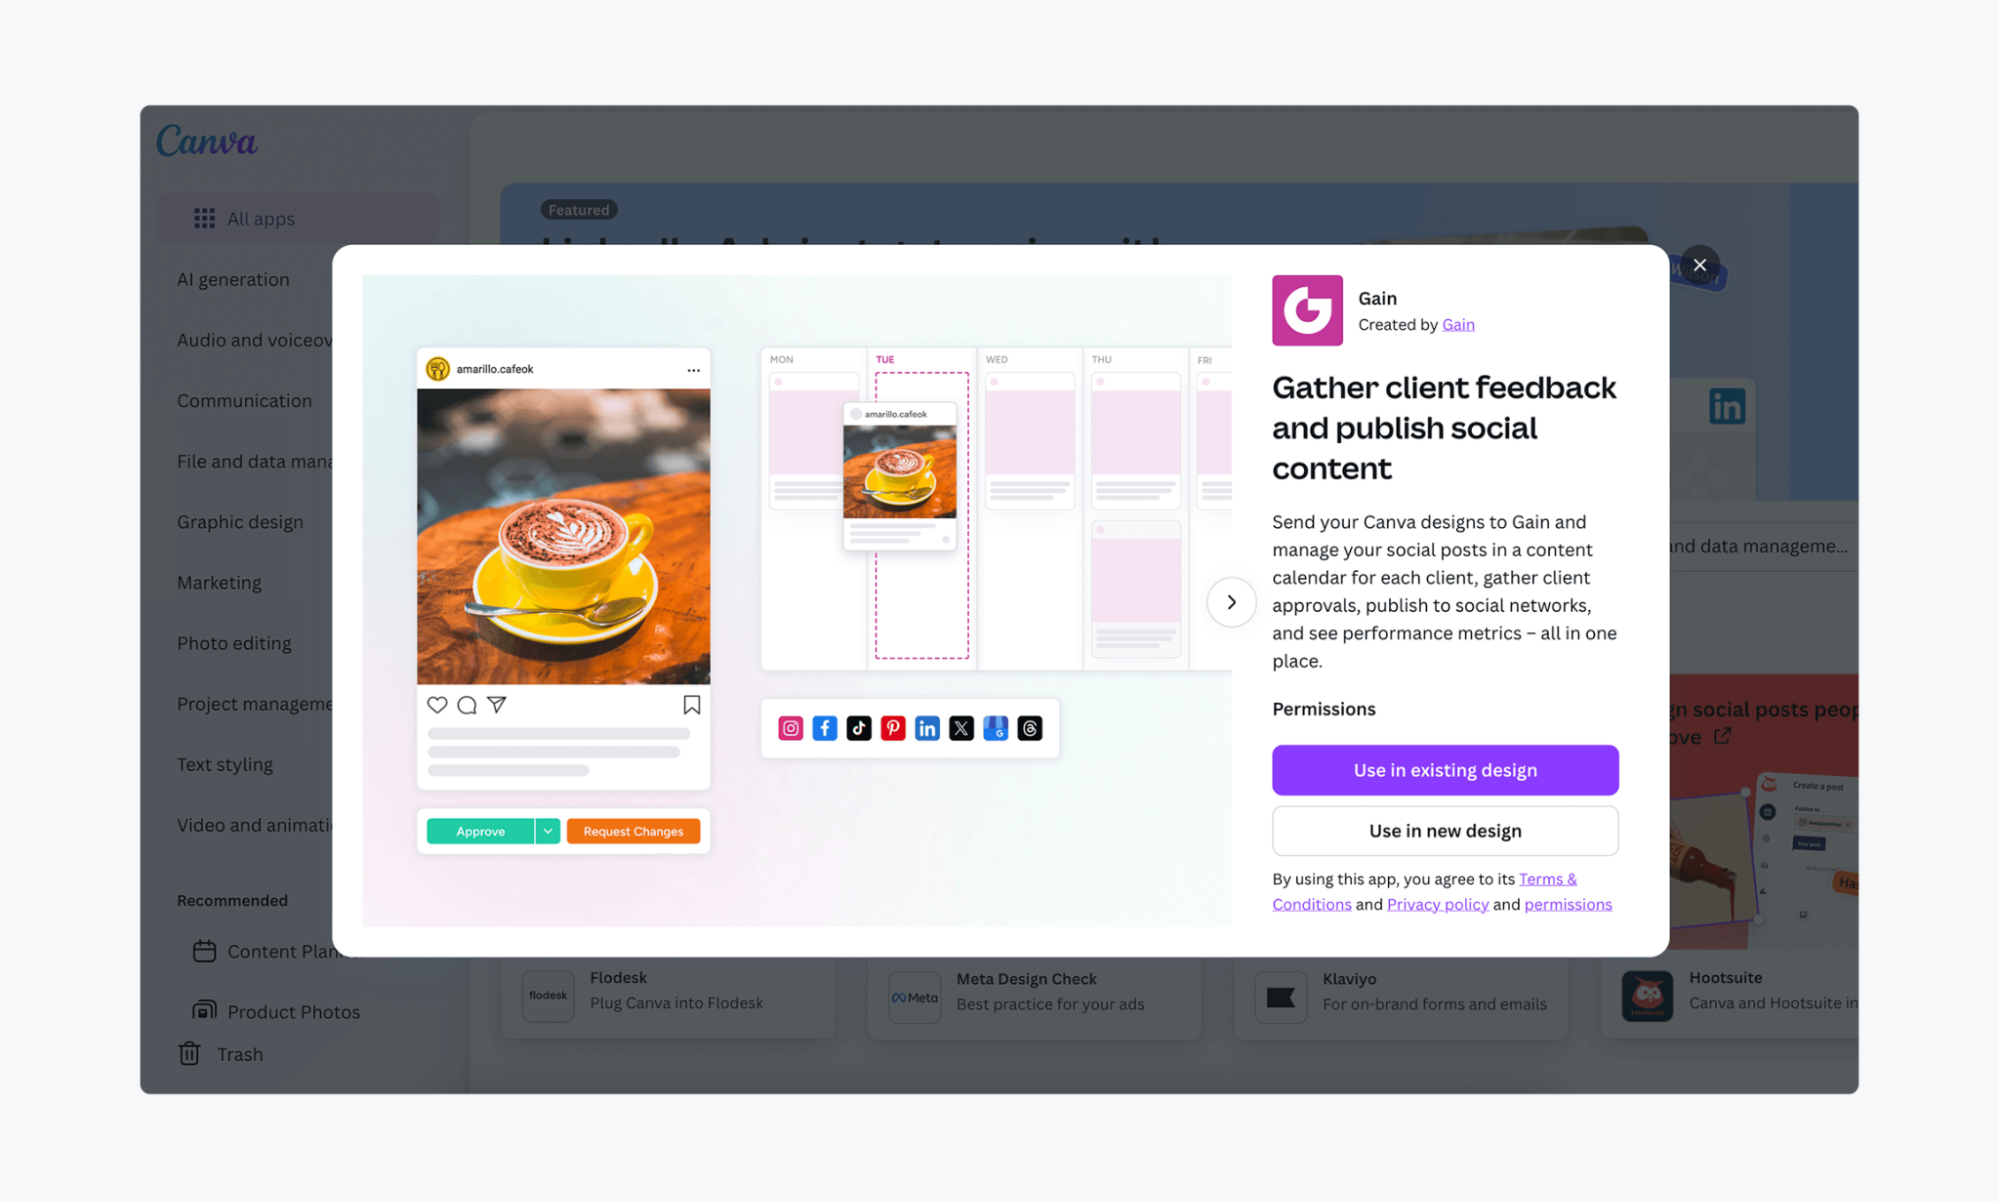
- Log into your Gain account and connect your workspace
- Select the social channel and workspace to send your design to
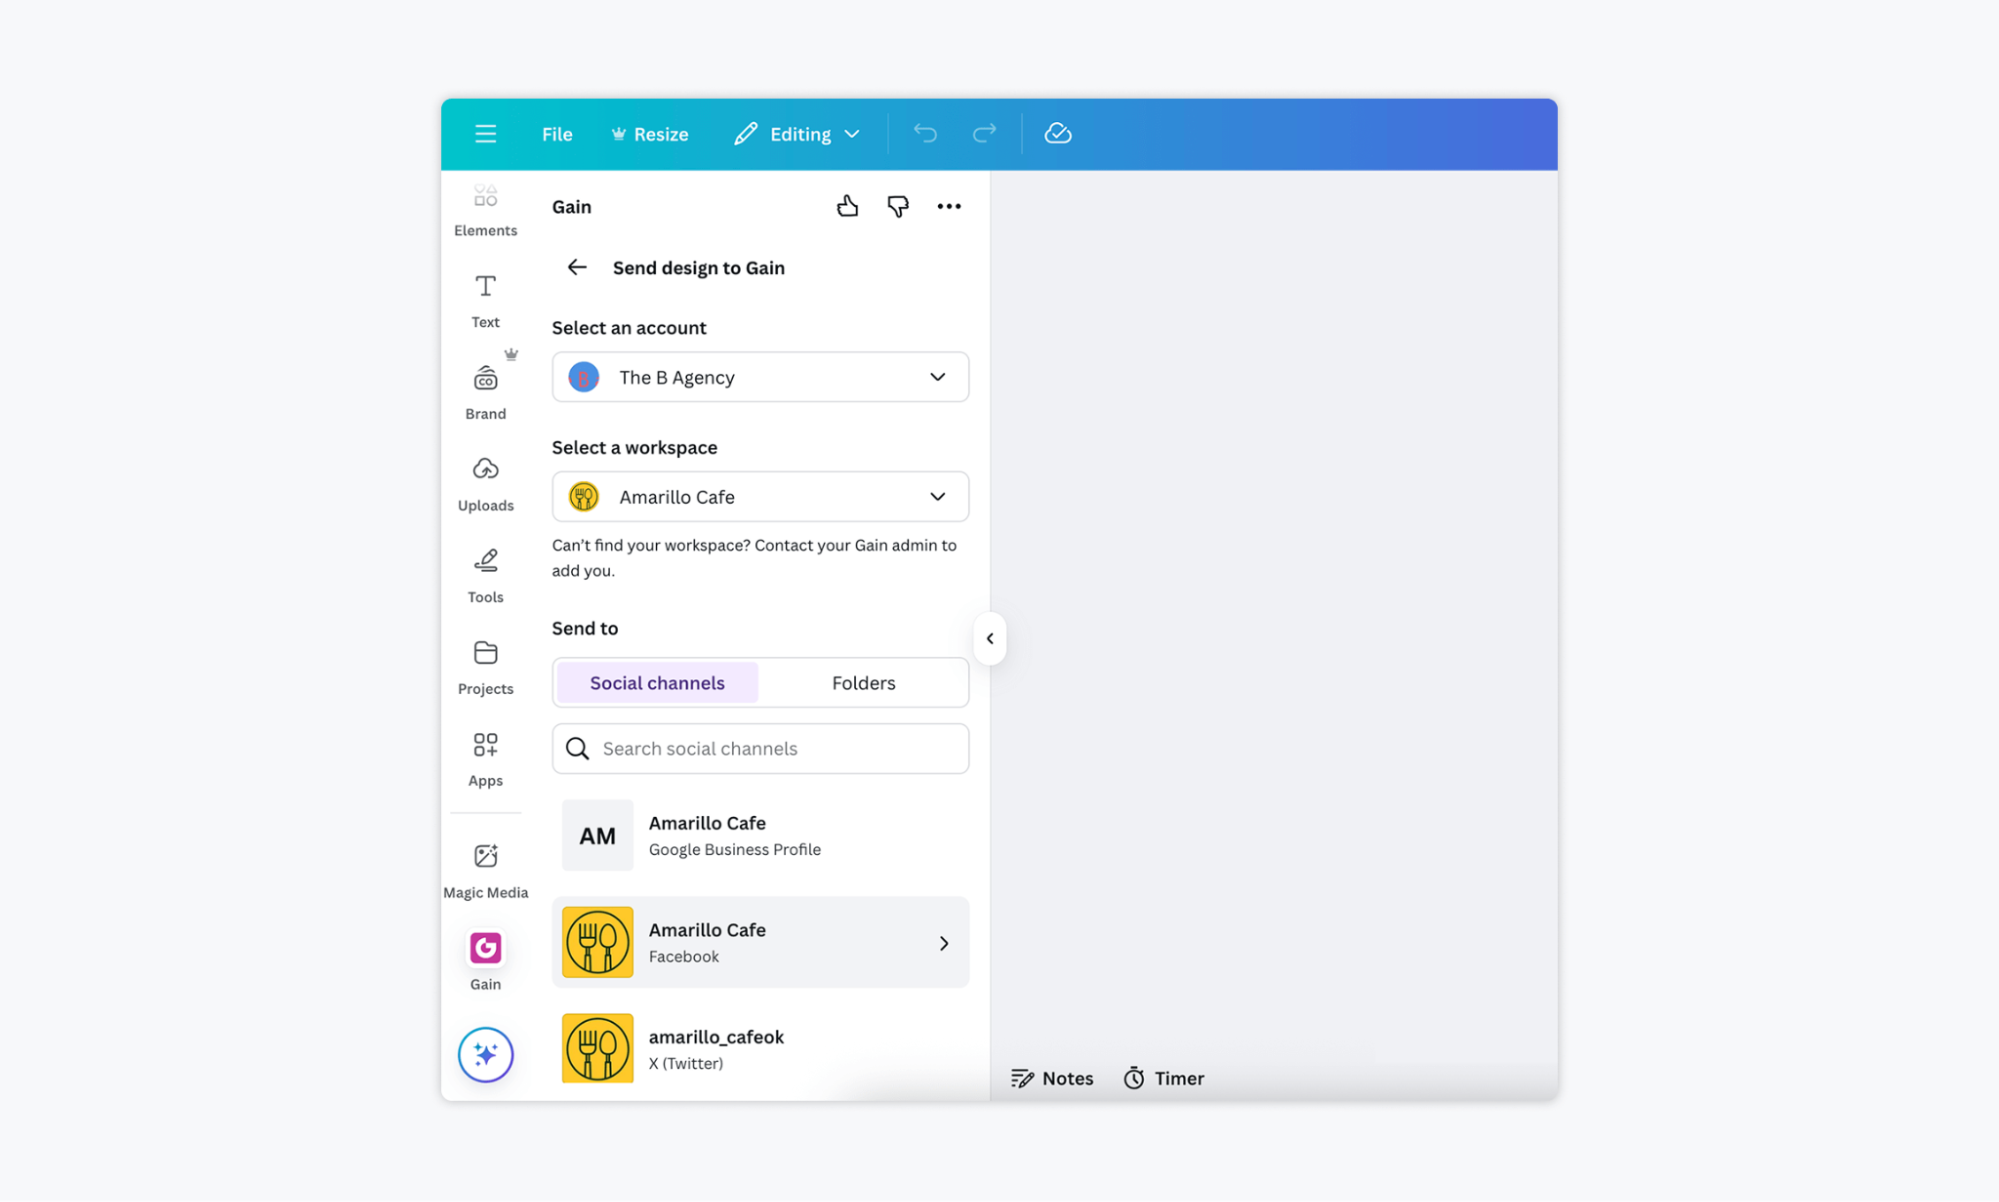
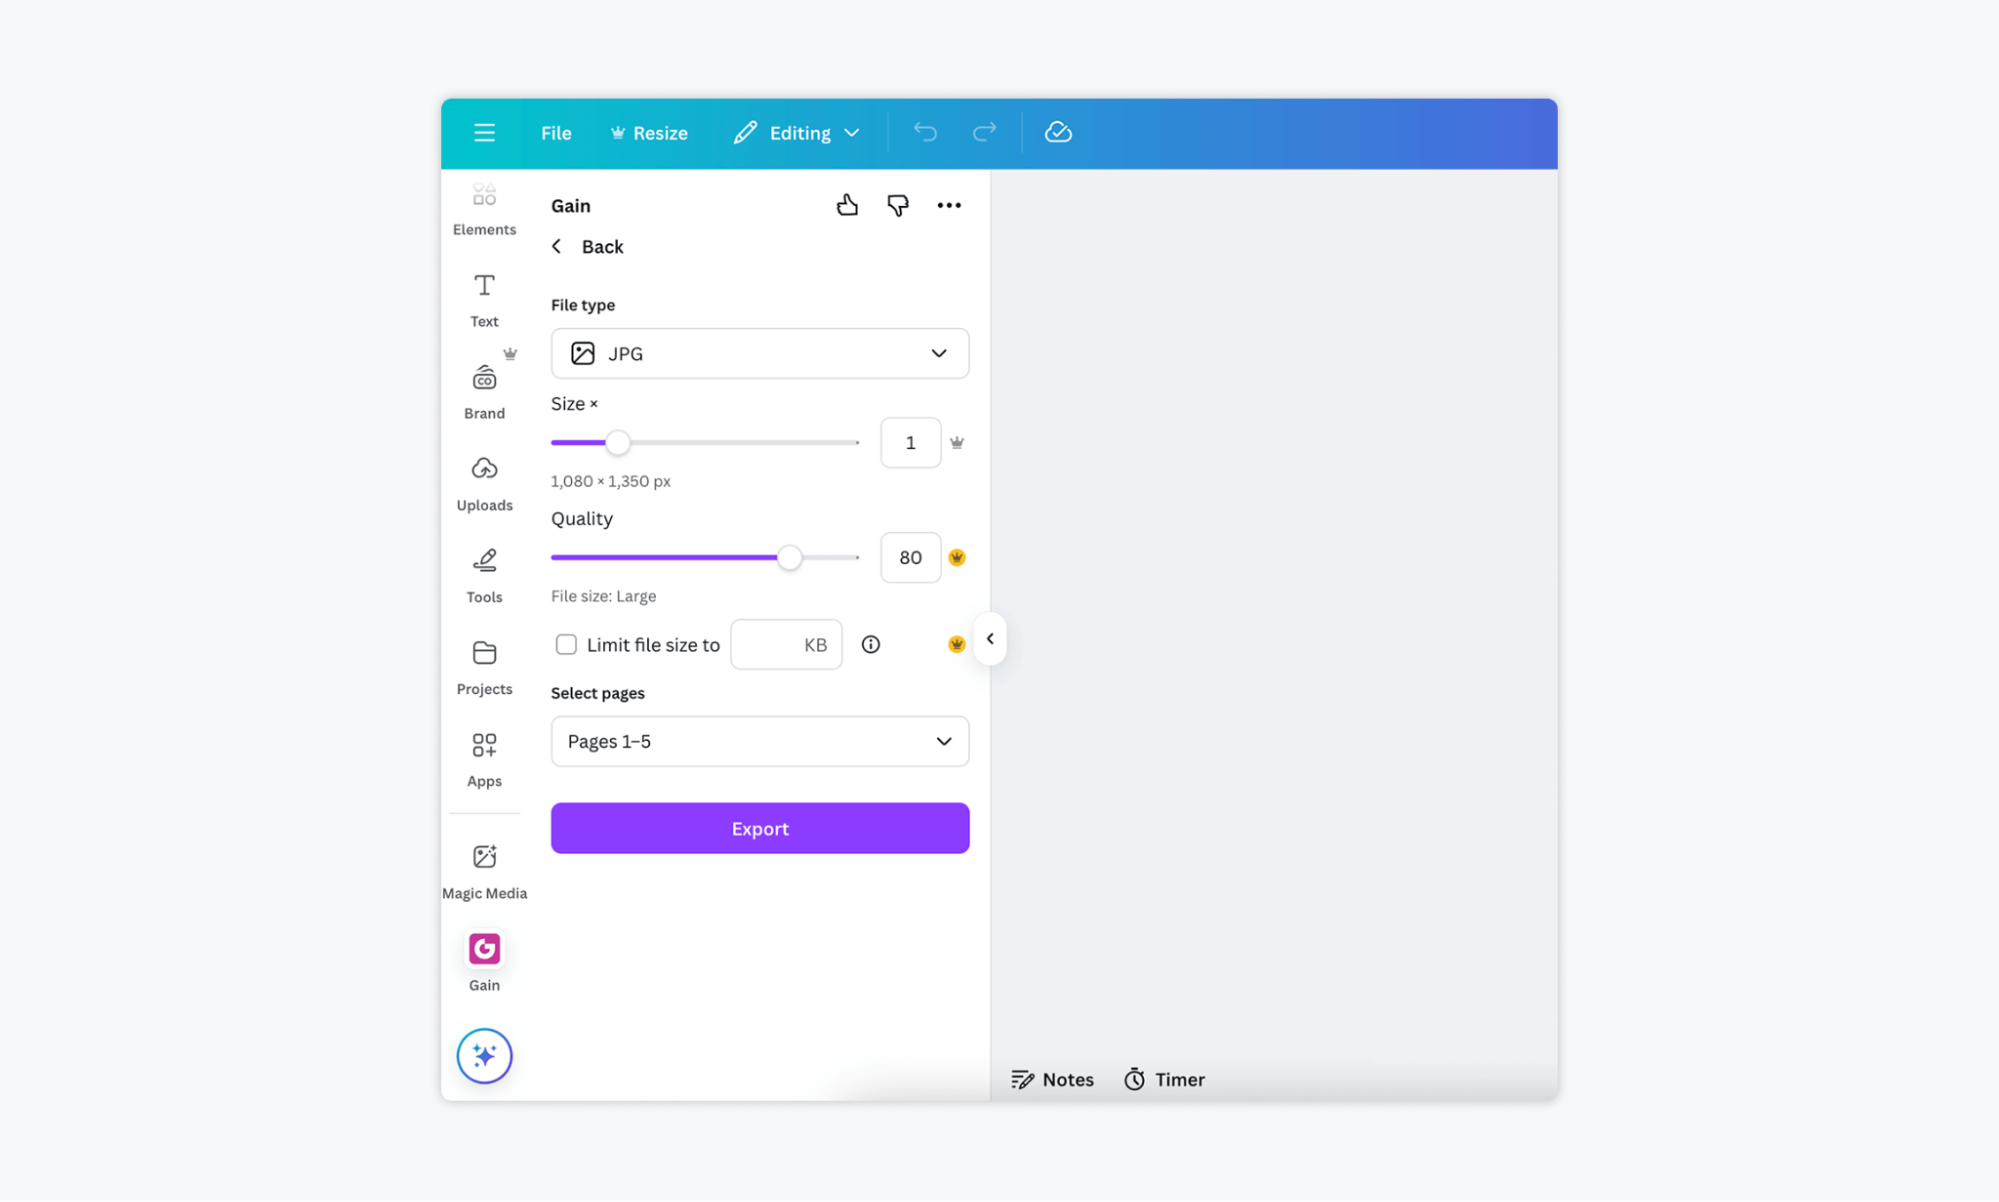
- Choose file type, size, and quality, and click Export.
Pros and Cons
| ✅ Pros | ❌ Cons |
| Ideal for agencies and teams that need content to be approved before it’s published | Requires a Gain account and initial setup |
| Direct Canva integration simplifies design handoff | |
| Auto-publish after approval—no manual uploads needed |
Best for: Marketing teams or agencies that need content approvals, scheduling, and publishing—all in one streamlined workflow.
FAQs
Direct posting publishes your design instantly, while scheduling (Pro feature) lets you plan content ahead. Scheduling is useful if you want posts to go live at specific times without manually publishing them.
You can publish directly from Canva to some platforms with a free account, but features like scheduling and content planning are only available with Canva Pro.
Yes, Canva is an excellent tool for social media marketing, especially for individuals, small businesses, and teams that need to create visual content quickly and consistently. It offers thousands of templates, drag-and-drop editing, and design tools tailored for platforms like Instagram, Facebook, and LinkedIn, among others. You can easily customize content to match your brand without needing advanced design skills. On its own, Canva handles the design side well. But when combined with tools like Gain for scheduling, content approvals, and publishing, it becomes a complete content workflow solution.
Choose the Method That Best Suits Your Workflow
In this article, we’ve walked through the different ways you can publish content from Canva—and when each option makes the most sense.
For solo creators, Canva’s native tools may be more than enough. But if you’re handling social media for clients or need content approved before it goes live, Gain offers a seamless way to bridge the gap between design and distribution.
With the Gain + Canva integration, you can streamline your publishing workflow—from creation to approval to scheduling—all in one place.
Start your free trial today!


")
